AirPods not only facilitate listening to music but can also be used to answer phone calls or talk to the built-in assistant i.e. Siri. Off late, A lot of users started complaining that their Airpods won’t connect even after following all the steps correctly.
If you are also someone who is not able to connect airpods to iPhone then this article is for you. We will discuss the reasons behind the issue along with ways to fix Airpods not connecting issues.
Why is the problem caused?
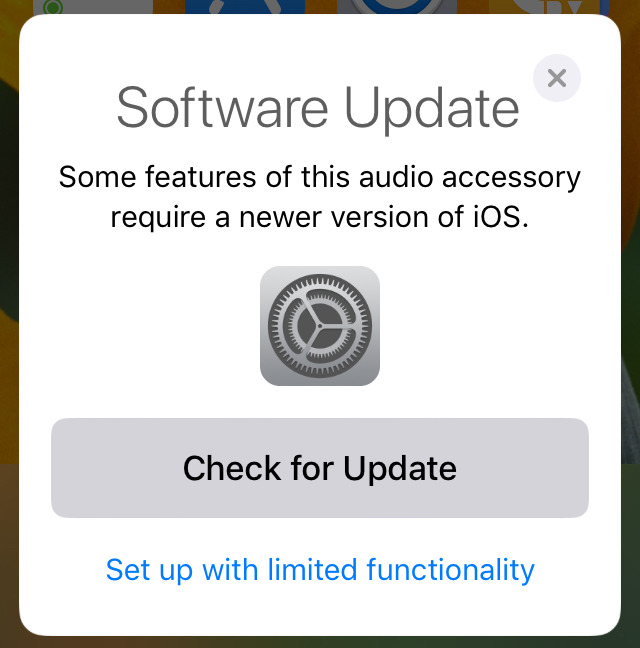
The AirPods necessarily require that the devices you are using have the latest version of iOS. In fact, when you are setting up your AirPods for the first time, you will receive a message right in the beginning that warns the user of the same. However, this only happens when you are setting them up. As you start using it and updates come in, you must frequently check to ensure that your Apple device has all the updates.
It is important to understand the problem you are facing. When you connect AirPods, you aren’t just connecting it to that one device, for example, your iPhone. You are essentially pairing up your AirPods with all the devices on your iCloud. Sometimes, what happens is that the AirPods lose their Bluetooth connection in a matter of a few minutes. You may be able to efficiently work with your Bluetooth headsets but, that does not mean that your AirPods necessarily have some problem.
How to connect AirPods?
There are two generations of the AirPods and both have different requirements that must be met:
AirPods Generation 1:
To connect the AirPods Generation 1 to your Apple Devices, you must have one of the following:
- Apple devices that work on iOS i.e. iPhone, iPad, iPod must be updated to iOS 10 or later.
- The Apple Watch must be updated to watchOS 5.2 or later.
- Apple TV must be updated to tvOS 12.2 or later.
- Mac must be updated to MacOS 10.14.4 or later.
AirPods Generation 2:
To connect the AirPods Generation 2 to your Apple Devices, you must have one of the following:
- Apple devices that work on iOS i.e. iPhone, iPad, iPod must be updated to iOS 12.2 or later.
- The Apple Watch must be updated to watchOS 3 or later.
- Apple TV must be updated to tvOS 11 or later.
- Mac must be updated to MacOS Sierra or later.
Connecting Airpods to iPhone
Follow the steps below to successfully connect your AirPods to your iPhone:
- On the iPhone, go to the home screen.
- Hold the AirPods close to the iPhone.
- You should be able to see a setup animation on the iPhone Display.
- Tap on Connect.
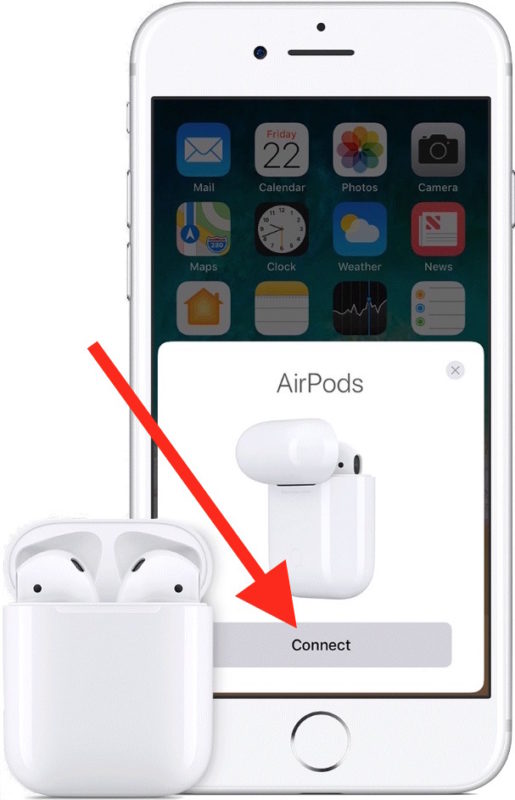
- Tap on Done.
Fix Airpods Won’t Connect Issues
Before we get started on how to fix this problem, let us first discuss some obvious things that must be done.
1. Turn on Bluetooth
Make sure that your Bluetooth is turned on the device.
2. Charge your AirPods and Charging Case
The Airpods may not be charged and hence it may not connect to your iPhone. So make sure that your Airpods are charged.
3. Make sure that the AirPods are in the range of the iPhone
Keep your Airpods close to iPhone when you connect them.
4. Make sure that the AirPods are in Bluetooth pairing mode
Airpods should be in pairing mode when you try to connect them.
5. Check to see if the AirPods aren’t connected to another device
Airpods cannot be connected to multiple devices at the same time. If your airpods are connected to some other device, then disconnect it first and try connecting it with your iPhone.
6. Turn Bluetooth Off and On again
Switch your Bluetooth as it may be possible that the bluetooth is not turned on.
Once you have tried all of these and still are facing a problem, move on to the methods listed below:
7. Check if an update is available:
As mentioned above, AirPods can work efficiently when the system is updated. To check if there are any new updates, do this:
- Go to Settings.
- Go to General.
- Click on Software Update.
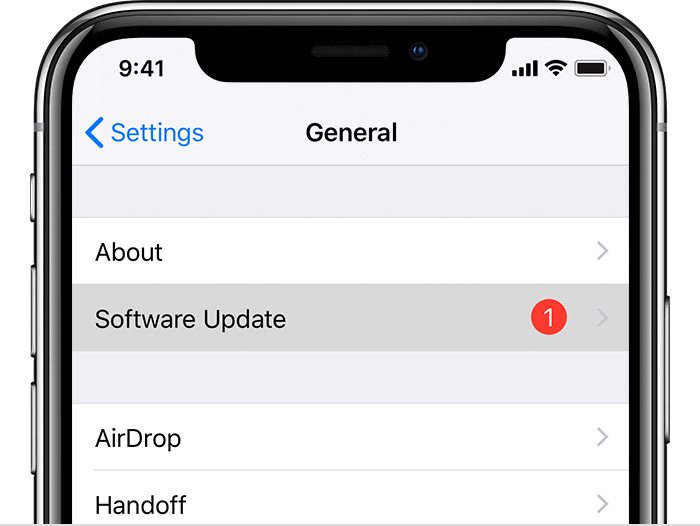
- Tap Install Now.
8. Reset All Settings
It is possible that an issue is being incurred as there are some corrupt setting files or because the device is not set up properly. These get solved by resetting all the settings. This can be done by:
- Go to Home.
- Open Settings.
- Go to General.
- Tap on Reset.
Select Reset all Settings.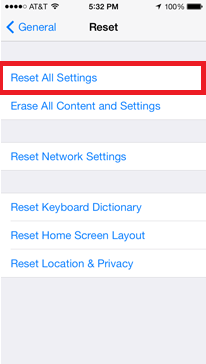 9. DFU Restore the iPhone
DFU stands for Device Firmware Update and is one of the most extensive restore processes you can execute on an Apple Device. It essentially erases all the code and then restores it all on the device. It is an easy way to solve not only this but many more software problems together. For this, you require the use of your USB cable. Follow these steps:
- Use the Lightning cable and connect your iPhone to the Computer.
- Open iTunes.
- Hold down the Power and Home button together.
- Do this for at least 8 seconds.
- Once this time interval has passed, let go of the Power Button only.
- Let go of the Home Button when the iPhone displays the message “iTunes has detected an iPhone in recovery mode”.
- To ensure that you are doing the process right, your screen would be completely black.
- If the iPhone display is not completely black then, repeat all the steps above once again.
If you want a more detailed guide on How to restore iPhone using DFU mode, then read this Step by Step DFU Mode Guide
Once this is done, you would have restored your iPhone using iTunes and hopefully, the problem would have been put to rest.
Final Words
AirPods are advertised to be connected to the devices easily. But, this is not always the case. When the AirPods don’t auto-connect it can be quite frustrating. To ensure this, keep your AirPods and its charging case completely charged whenever possible. It is not very tough to set up the AirPods on an Apple or non-apple device if you meet all the requirements mentioned above. So, what are you waiting for? Put on your AirPods and start jamming to your favourite playlists!
We hope this article ensures sound experience!


![How to Bypass iCloud Activation Lock on iPhone [7 Ways] – 2024 Guide](https://www.digitalcare.top/wp-content/uploads/2019/03/icloud-211x150.jpeg "How to Bypass iCloud Activation Lock on iPhone [7 Ways] – 2024 Guide")